How Can We Help?
Journal
Objective
- To capture the process of passing journal transaction entries.
Introduction
- Journal relates to basic transaction entries between two or more accounts
- There are four types of journal entries in Cittaerp as follow
- Standard Journal
- This is basic as no further action after the journal is posted
- Recurring Journal
- After the journal is posted, the journal automatically recur based on the rules as set by the user at the time of creating the original journal.
- Recurring journal is commonly used for prepayment amortization, periodic accruals, etc
- Auto-Reversing Journal
- After the original journal is posted , the original journal auto reverse based on a specific date based on the rules set by the user at the time of creating the original journal
- Period Waiver Journal
- This is unique journal that can be posted to a closed period
- This requires special authorization to process
- The period waiver posting needs to be enabled and activated by authorized user for this to work
- Standard Journal
- Each of the journal type has a unique workflow approval route
Process
- Go to General Ledger>>Transaction>>Journal
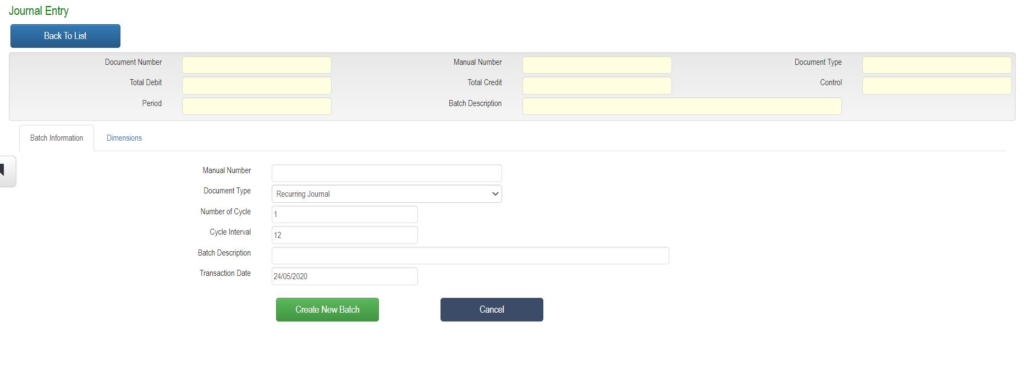
- Click the (+) to add new journal, the following header screen appears
Standard Journal-Header

- Select Document Type as Standard Journal
- Completes other relevant fields
- Click Create Batch Button
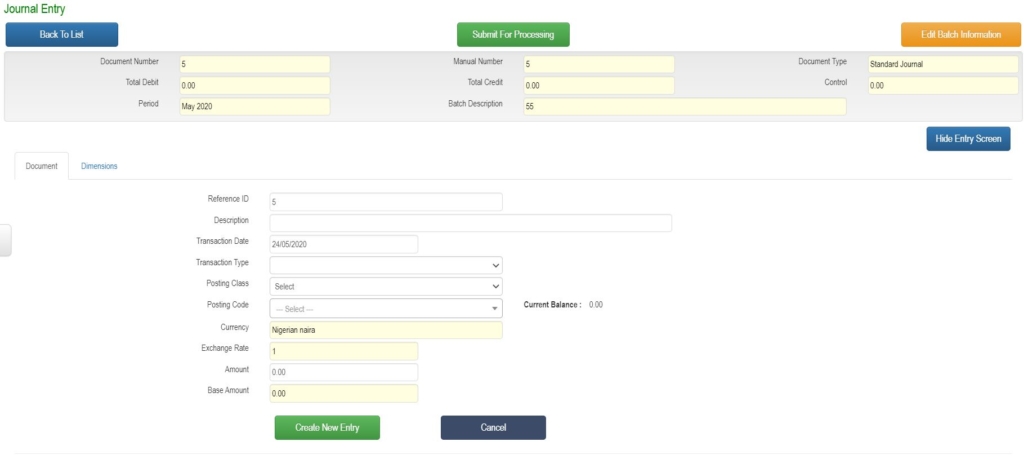
- The Journal Detail screen opens
Recurring Journal-Header

- Select Document Type as Recurring Journal
- Enter Number of Cycle
- This is number of times the journal will be repeated and recur
- Enter Cycle Interval
- This is number months gap between each running cycle. Is it every 1 month, 3 months etc
- Completes other relevant fields
- Click Create Batch Button
- The Journal Detail screen opens
Auto Reversing Journal-Header

- Select Document Type as Auto Reversing Journal
- Enter the future Reversing Date of the Journal
- Completes other relevant fields
- Click Create Batch Button
- The Journal Detail screen opens
Period Waiver Journal-Header
- Select Document Type as Period Waiver Journal
- Enter the back period value date of the journal transaction
- Value dates determines back period to post the transaction
- Completes other relevant fields
- Click Create Batch Button
- The Journal Detail screen opens
Journal -Detail

- Select Transaction Type .
- This define nature of the entry as either debit or credit
- Select the post class
- This relate to the module source of the entry
- Select the post code
- This is the code or ID for the individual accounts for posting from the selected post class
- Enter the amount
- Completes other relevant fields
- Click Create Entry
- Entry is listed in the entry box at the bottom of the screen
- Enter multiple entries as may be required
- Click Submit for Processing button
- The system validates to ensure total debit is equal to total debits
- Transaction goes through a defined workflows approval route
- At final approval,
- System updates relevant accounts automatically